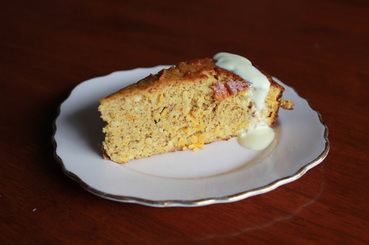
 We have had an excess of mandarins this year. They are delicious straight from the tree but I wanted to invent another way to use them and so I came up with this low sugar, gluten and dairy free cake. Please keep in mind we do not eat a lot of sugary foods and so this cake is quite tart. If you are new to low sugar you might like to double or even triple the sugar and wean down from there. Oranges also work a treat in this cake. Use two medium size instead of the mandarins. Ingredients: Approximately 4 mandarins depending on the size. Mine weighed 360 grams. 250 grams almond meal 1 teaspoon baking powder ¼ cup coconut sugar (regular sugar or rice malt syrup would also work) 5 large eggs 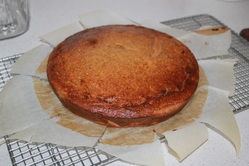 Method:
Put the mandarins in a saucepan and fill with water to cover. Bring them to a slow boil and continue boiling for approximately 40 minutes. A fork should easily pierce through the skin and flesh. While they boil, preheat your oven to 180 degrees. Grease and line a 20cm round tin. If you’re not sure how to line a tin see the instructions below. Once the mandarins are cooked let them cool for a few minutes before putting them in a food processor. Try to open them up a bit using a fork so you can pick any pips out. Leaving the pips in will result in a bitter cake. Once the pips are out, blitz the mandarins to a pulp. In my Bellini this took about 15 seconds on speed 6. Scrape down and repeat if necessary. Add the almond meal, sugar, baking powder and eggs to your food processor. Stir together on speed 3, 30 seconds, until combined. Pour into your greased and lined tin. Bake for 1 hour. When ready, a skewer inserted into the middle should come out clean. This is delicious served hot or cold and seems to improve overnight. Lovely served with cream and healthy enough you could probably call it breakfast! How to line a round tin. I start by tearing off a large rectangle of baking paper. Then, working your way around, cut slits in towards to middle but not all the way, so you end up with a round area about 10 cm out from the middle. Then lay it into your greased dish, overlapping the cut parts to form walls. Check out my baked cake picture and you’ll be able to see the slits.
0 Comments
Leave a Reply. |
Archives
November 2016
Recipes |
 RSS Feed
